
I always think of Elm at some point when working up a JavaScript headache.
Zero run-time errors, world-class error messages and a strongly typed language are amazing features when making complex and stable software. Nothing in JavaScript or TypeScript can match it.
There are ways to achieve many of the features of Elm in a React app, but in practice it is much harder earned.
When escape hatches are present, we as humans will use them. When code discipline is enforced by the language, our mental load is decreased.
Elm enables us to work with complexity without losing sleep.
Gradual adoption with Parcel
Rewriting a large app from a JavaScript framework to Elm should be done gradually. Replace one simple component and decide whether you like it, or need it.
The Elm creator Evan Czaplicki has written some guidelines on gradual introduction if you are serious about trying Elm in production.
In this guide, I will use the Parcel bundler instead of Create React App (Webpack). There are already a few Webpack oriented tutorials out there (links at the bottom).
I also want to show how to do it with function components and TypeScript.
Parcel has built-in support for Elm, so there is not much configuration to it.
Implementing Elm in React is actually deceptively simple. As long as you know how, of course.
NOTE: I won't explain much of the Elm stuff. It is best covered in the official introduction.
Although this is an advanced topic, this tutorial can be useful for seasoned React developers wanting to get a hands-on feel of Elm.
Let's get started!
Clone the starter repo. It's basically a Parcel starter with React and TypeScript.
Create a folder in src named Elm and create the file Main.elm.
mkdir src/Elm && touch src/Elm/Main.elmWe will start with some hard-coded markup.
Insert this into the Main.elm file:
module Main exposing (main)

import Html exposing (..)


main : Html msg
main =
    div []
        [ h2 [] [ text "This is an Elm component" ]
        , div [] [ text "Count: 0" ]
        , button [] [ text "+" ]
        , button [] [ text "-" ]
        ]
To avoid TypeScript errors, let's also declare the module in a new file named src/Elm/Main/index.d.ts
mkdir src/Elm/Main && touch src/Elm/Main/index.d.tsInsert this code into index.d.ts.
export namespace Elm {
  namespace Main {
    export interface App {
      ports: {};
    }
    export function init(options: {
      node?: HTMLElement | null;
      flags: null;
    }): Elm.Main.App;
  }
}
Copy-pasting this is fine. We will soon automatically generate this file, so you won't need to modify it manually.
Inject Elm into the React App
Go to the index.tsx file and import the Elm module:
import { Elm } from "./Elm/Main";Modify the ElmComponent to look like this:
function ElmComponent({ count, setCount }: ComponentProps) {
  const [app, setApp] = React.useState<Elm.Main.App | undefined>();
  const elmRef = React.useRef(null);

  const elmApp = () => Elm.Main.init({ node: elmRef.current, flags: null });

  React.useEffect(() => {
    setApp(elmApp());
  }, []);

  return <div ref={elmRef}></div>;
}
Then run yarn start. Parcel will automatically install the Elm dependencies. The app will probably fail.
You will now see a new file in your project root named elm.json.
Rewrite the source-directories property in elm.json into this:
"source-directories": ["src/Elm"],Press Ctrl+c if the app is running, run yarn start again and check http://localhost:1234.
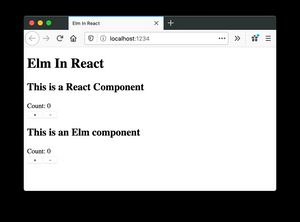
Your app is gradually improving, just by having some Elm in it 😄
Only thing is, the Elm part is just a simple type-safe Html element, but there is no state in the app below.
Let's fix that.
Make Elm own the state
When Elm is communicating with TypeScript/JavaScript, it's important to decide whether the relevant state should be owned by Elm or React.
I will make Elm own the state and be the source of truth.
To me, it makes most sense to have Elm control the state and pass it to React. There could of course be use-cases where it's necessary to control the state with React at first.
Make Elm stateful
To make the Elm component more interactive, we need to add a bit more stuff to the Main.elm module.
module Main exposing (main)

import Browser
import Html exposing (..)
import Html.Events exposing (onClick)


main : Program () Model Msg
main =
    Browser.element
        { init = init
        , update = update
        , subscriptions = subscriptions
        , view = view
        }


init : () -> ( Model, Cmd Msg )
init _ =
    ( 0, Cmd.none )


type alias Model =
    Int


type Msg
    = Increment Int
    | Decrement Int


subscriptions : Model -> Sub Msg
subscriptions _ =
    Sub.none


update : Msg -> Model -> ( Model, Cmd Msg )
update msg model =
    case msg of
        Increment step ->
            ( model + step, Cmd.none )

        Decrement step ->
            ( model - step, Cmd.none )


view : Model -> Html Msg
view model =
    div []
        [ h2 [] [ text "This is an Elm component" ]
        , div [] [ text ("Count: " ++ String.fromInt model) ]
        , button [ onClick (Increment 1) ] [ text "+" ]
        , button [ onClick (Decrement 1) ] [ text "-" ]
        ]
To walk through the basics, we turn the main component into a Browser.element. The html is moved from main into view
mainis the entry point of the appinitsets initial state (of type Model). Also runs initial commands/side-effects (if needed)subscriptionslets you subscribe to data that changes, like JavaScript, but we will not use it hereupdateupdates the model, it's like a reducer, but betterviewnow takes in the model, displays it and is able to send messages (Msg) to to updateModelis the type definition for the state model. In this case, it's just an integer. Normally it's a record with lots of data.Msgis a collection of messages to dispatch to update, comparable to Redux actions
Now, you have two components with state working independently of each other.

Also notice on the bottom right corner, you have gained a powerful time-traveling state debugger for the elm state.
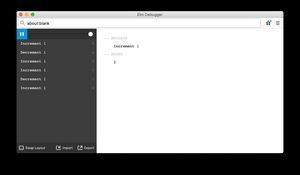
The finish line is closing in. Let's hook the components together.
Establish communication lines in Elm
We will now make Elm talk with JavaScript. React will set the initial value, but Elm will be the source of truth for the state.
First, we will put the word port in front of the top module declaration like this:
port module Main exposing (main)This states that the Main module can communicate with JavaScript outside of the Elm application.
Then we will add a port command that we will send to React, and a Flags type for defining the initial state coming from React.
port updateCountInReact : Int -> Cmd msg


type alias Flags =
    Int
We also need to tell the main and init function to take in flags from the JavaScript side. We do that by updating the type definitions.
And we take the flags in init and set them as the initial state for the Elm app.
main : Program Flags Model Msg
main =
    Browser.element
        { init = init
        , update = update
        , subscriptions = subscriptions
        , view = view
        }

init : Flags -> ( Model, Cmd Msg )
init flags =
    ( flags, Cmd.none )
Last thing in the Elm code is to replace Cmd.none with the updateCountInReact command in the update function:
update : Msg -> Model -> ( Model, Cmd Msg )
update msg model =
    case msg of
        Increment step ->
            ( model + step, updateCountInReact (model + step) )

        Decrement step ->
            ( model - step, updateCountInReact (model - step))
I'm keeping the model + step logic duplicated, just to keep the example simple, but you could of course make it into a function.
The Elm logic is finished, but the app will not work until we have adjusted the React part.
Establish communication lines in React
When using TypeScript, we need to update the type definitions for the flags and ports we just made. Doing it manually is just painful.
We will use a package called elm-typescript-interop made by the very productive package author Dillon Kearns (elm-pages, elm-graphql, elm-markdown).
In package.json, just add this script. There is no need to install it:
  "scripts": {
    "start": "parcel index.html",
    "ts-interop": "npx elm-typescript-interop"
  }
Then run
yarn ts-interopThe index.d.ts in the Main folder is now updated with the types from the Elm ports 🎉. Just run this command every time you need to update something between Elm and TypeScript.
Now let's fix the typescript error that appeared in index.tsx by setting flags to the initial value from React, namely the count value passed from props.
const elmApp = () => Elm.Main.init({ node: elmRef.current, flags: count });TypeScript is satisfied. And now lets's add another useEffect in the ElmComponent, so the component looks like this.
function ElmComponent({ count, setCount }: ComponentProps) {
  const [app, setApp] = React.useState<Elm.Main.App | undefined>();
  const elmRef = React.useRef(null);

  const elmApp = () => Elm.Main.init({ node: elmRef.current, flags: count });

  React.useEffect(() => {
    setApp(elmApp());
  }, []);

  // Subscribe to state changes from Elm
  React.useEffect(() => {
    app &&
      app.ports.updateCountInReact.subscribe((newCount) => {
        setCount(newCount);
      });
  }, [app]);

  return <div ref={elmRef}></div>;
}
In the ReactComponent, we can remove the update logic, as Elm has taken over the state management.
function ReactComponent({ count }: ComponentProps) {
  return (
    <div>
      <h2>This is a React Component</h2>
      <div>Count: {count}</div>
    </div>
  );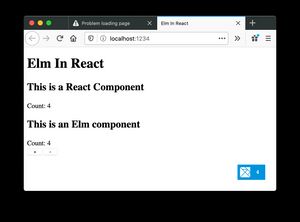
}The result is in
Now you control the state rendered in both React and Elm from the Elm App.
Exactly how you do it in your own project might vary. A viable path is to start using Elm as the state manager and React as the view renderer. Then you learn lots of the good parts of Elm first.
When Elm owns all state, you can gradually take over the React rendering by expanding the view function and replace the React views.
You could also make an an incoming message port from React to Elm and pass string messages to Elm which then updates the state.